I’ve been taking photos of food for quite a while. I first started in 2009. I was bored one day and decided to make some cookies. I found a cookie recipe on Allrecipes.com that I decided to make and saw that you could upload a photo of your food. I thought, “why not?” I had just gotten my first digital camera and decided to see what it could do. It wasn’t a very fancy camera, just a point and shoot (not a DSLR), but I made it work.
I quickly became hooked on taking photos of food and the rest is history. Since my first photos of those cookies, I have most definitely grown as a photographer. To be honest, some of the photos I posted during the first couple of years sucked! Now, I’m by no means an expert and I think I still have a lot to learn, but I think my photos are decent. I find some days it’s just not working and I just can’t get the food to look good. Yet other days it feels like the photography gods are shining down on me and I come up with glorious photos. I thought I would share some of the tricks I have learned along the way to make the glorious photos happen more often than not.
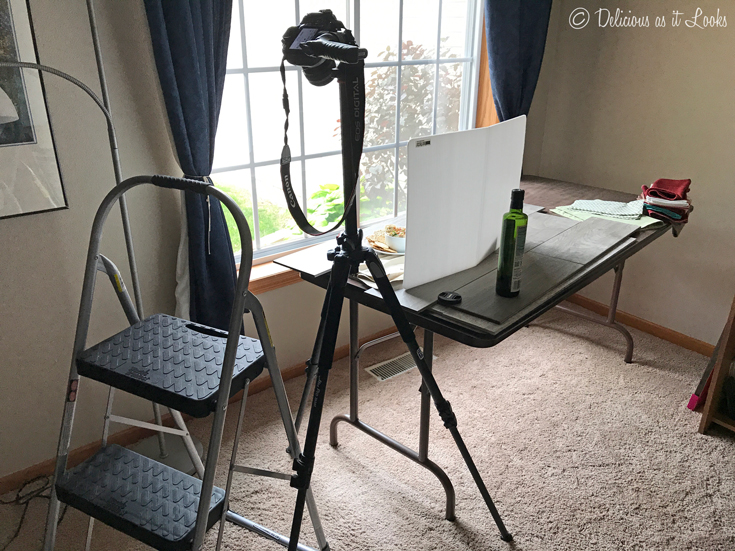
When I first stared taking photos of food, I quickly found out that natural light is the way to go. Which continues to be frustrating to this day, having only a limited amount of light in the day, especially in the winter. A few years ago I did purchase a light kit, but I only used it a few times after I first got it and haven’t used it since. I just like natural light so much! I do continue to use the white bounce card that I got with the kit and it plays a vital role in my photography. My other “must have” photography accessories are a tripod (for taking “action shots” by myself) and a step stool (to get those overhead shots).
I have quite a few cameras and accessories on my wish list, one of which is the Light L16 Camera. This camera sounds amazing for food photography. It features unmatched low light performance (I would love to try it in the late afternoon in winter here in Iowa) and precise depth of field control. Depth of field refers to how much of the image, either in front of or behind the focal point, is in focus. Adjusting the depth of field can have a great impact on the overall look of the photo. I usually use an aperture (f-stop) of f/3.5 to f/5.6 for my food photos. I like it shallow! Being able to control the f-stop is a very important feature of a camera.
 |
| My studio and lighting setup |
One of the main reasons we bought the house we are in now was because of this front bedroom, which became my studio. It has a large window that gets good light most of the day. It only gets direct light in the early morning and I don’t usually take photos then, so it works out. That’s the first tip: natural, but not direct light. I don’t want the sun shining directly on the subject, instead it should be diffused. Usually when I take photos, it’s in the afternoon, when the sun is high, but not shining directly into the window.
 |
| My natural light setup for food photography |
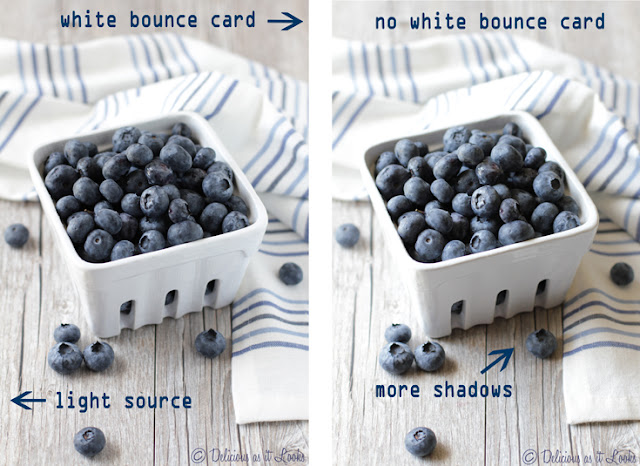
My second tip is using a white bounce card. This is simply a white board that is set opposite the light source to reflect the light and fill in the shadows with light. There are still some shadows, but much less so. And the shadows that are left are very natural looking. Natural is always the look I’m going for.
I thought I’d demonstrate the effect of the white bounce card on these photos of blueberries. Why blueberries? Because they were on sale and I have a ton of them currently in my fridge. Also, I bought this cute white dish that looks like a berry carton and haven’t had many opportunities to use it yet. In the photo on the left, the window is on the left side and the white bounce card is on the right. You can see how the shadows are greatly reduced on the right side of the dish of berries compared to the photo without the bounce card on the right. It filled in the shadows with reflected light. Pretty cool, huh?
Now, sometimes it looks neat to have more shadows – kind of moody – so maybe a bounce card isn’t necessary. It just depends on the look you are after. I usually use the bounce card so most of the food is illuminated, but still natural looking.
Here is the result of the Baba Ganoush photo shoot above. I used the tripod so I could click the shutter while holding a cracker at the same time. Not bad!
I hope you enjoyed my first set of food photography tips. I hope to do more posts in the future, so let me know what you would like to learn about!


This is very useful, Dianne! I usually take my photos outside but in the shade. I've yet to try the bounce card, though. I'll have to give it a try.
Thanks for your comment!